
Quickstart: launch your first campaign
A step-by-step guide that takes a new user from the empty campaigns page to a live, sending campaign - covering creation, contact sourcing, copy, settings, and launch.
Overview
A campaign in Ken is the container for everything related to an outreach push: the contacts you target, the email sequence they receive, the AI workflows that personalise each message, and the analytics that track results. Every campaign goes through a build phase (contact enrichment, AI qualification, email finding) before emails go out.
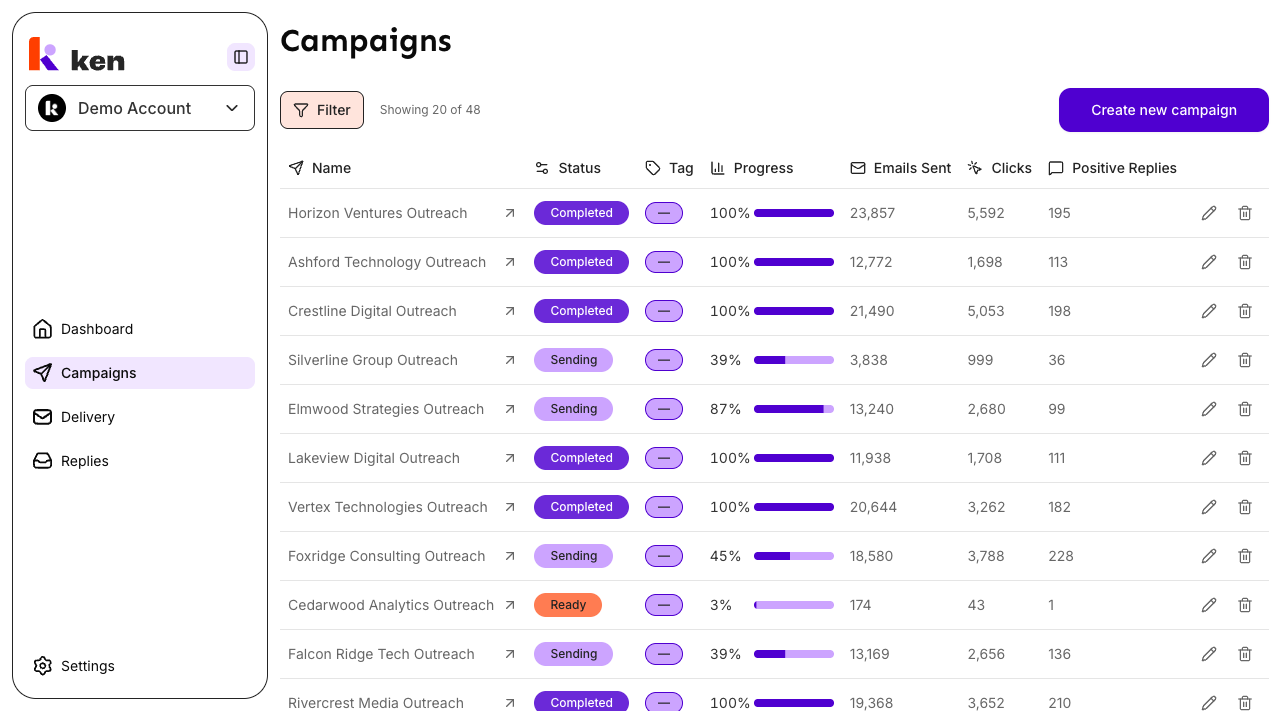
You create and manage campaigns from the Campaigns page in the left sidebar. Each campaign has its own detail page with five tabs - Analytics, Leads, Sequence, Actions, and Settings - where all configuration happens after creation.
Before you start
- You need an active Ken workspace. If you have not completed onboarding, do that first (see Account setup and onboarding).
- At least one sender configuration (inbox) must be connected and usable before you can launch. Check Settings inside the campaign after creation.
- For CSV uploads, prepare a file with at minimum these columns: First Name, Last Name, and Company Name or Domain.
- Creating a campaign with AI costs one AI campaign credit. Creating manually does not. You can see your remaining credits in the header bar.
How to create and launch your first campaign
Step 1 - Open the campaign creator
Navigate to Campaigns in the left sidebar.
If you have no campaigns yet, you will see an empty state with the heading "Create your first campaign." Click Create new campaign.
If you already have campaigns, click the Create new campaign button in the top area of the campaigns list.
Step 2 - Name the campaign and set a contact limit
A form appears with two fields:
- Campaign Name - give it a descriptive name. You can rename it at any time from the campaign header.
- How many contacts do you want? - this is the upper cap on how many contacts the campaign will ever process. It cannot be increased after processing starts, so set it slightly higher than you think you need. The default is 1,000. If your account has a lead-credit balance, the field is automatically capped at your remaining credits.
Then choose how to create the campaign:
- Create with AI - Ken creates the campaign and drops you directly into the AI-guided build flow at
/campaigns/[id]/build. The AI asks a few questions, plans the campaign, and generates the sequence copy. This costs one AI campaign credit. - Create Manually - Ken creates a bare draft campaign and takes you straight to the campaign's Actions tab, where you configure everything yourself. No AI credit is used.
Either path takes around 20 minutes from creation to a buildable state.
Step 3 - Add contacts (Actions tab - Data Sources section)
Steps 3 through 6 apply to the Create Manually path. If you chose Create with AI, you are now inside the AI build flow at
/campaigns/[id]/build- follow the prompts there and refer to Create a campaign with AI for that walkthrough.
After creation you land on the Actions tab. The left sidebar shows three groups: Data Sources, Segmentation, and Review.
Under Data Sources, choose how you will source contacts:
Option A - Search Contacts (recommended)
- Click Search Contacts in the sidebar.
- Use the filter panel to narrow by job title, industry, company size, seniority, geography, and more against a database of 350M+ B2B contacts.
- Set the contact count you want to import.
- Click Start Import to begin importing.
A progress dialog tracks the import. After it completes, contacts move into the processing pipeline automatically - enrichment and email-finding start in the background.
Option B - Import Contacts (CSV)
- Click Import Contacts in the sidebar.
- Upload a CSV file. Required columns: First Name, Last Name, Company Name or Domain.
- Map your CSV columns to Ken's fields in the column-mapping screen.
- Click Start Import.
Note: contact-limit is fixed at creation. Importing more contacts than the limit will stop at the cap.
Step 4 - Write the email sequence (Sequence tab)
Open the Sequence tab. Here you build the series of emails contacts will receive.
- Click Add Email to add the first email step.
- Fill in the subject line and body. Use AI variables (e.g.
{firstName}, custom personalisation prompts) to make each message dynamic. - Set the wait days between steps using the wait-day control below each email card.
- Repeat for follow-up emails. The sequence supports up to 30 emails.
- Changes save automatically.
The readiness check requires at least one email step with copy before you can launch.
Step 5 - Configure sending settings (Settings tab)
Open the Settings tab and fill in:
- Sender Configurations - select which inboxes to send from. Leave empty to use all available configurations for your workspace.
- Sending Schedule - choose which days of the week to send and set a start time, end time, and timezone. The timezone picker only shows zones that your sending provider accepts.
- Contact Limit - verify the cap is correct. It cannot be raised after building starts.
- Max Emails per Day - optional hard ceiling on daily volume.
- Deduplication - choose whether to skip contacts already in this campaign, other campaigns, or contacted recently.
Click Save at the bottom of the settings form.
Step 6 - Launch
Go back to the campaign header (the campaign name and status badge at the top of the page).
When the campaign is ready to send, a Launch Campaign button appears in the top-right area. Click it, confirm the dialog, and sending begins.
If the button is not yet visible, the campaign is still in Draft or Building state. The Start button on a Draft campaign kicks off the build pipeline. After enough contacts are processed and ready, the button label changes to Launch Campaign.
The launch checklist - visible in the header area when the campaign is in Draft state - shows exactly which items are still blocking the launch. All checks must pass before the button becomes active.
How it works
When you click Create with AI or Create Manually, Ken creates a campaign record in Draft state immediately. No contacts, no sequence, and no settings are saved yet - only the name and contact limit.
After you import contacts, the processing pipeline begins:
- Enrichment - Ken fetches company data, social profiles, and additional contact attributes.
- Qualification - if you have enabled an AI qualification prompt in the Actions sidebar, contacts are scored against your ideal customer profile. Those that do not qualify are filtered out.
- Email finding and verification - email addresses are located and verified. Only contacts with verified emails proceed.
- Personalisation and rewriting - if AI variables are in your sequence copy, the system resolves each prompt per contact and per segment to produce personalised output.
A campaign can be in Building and Ready states at the same time. "Building" means the pipeline is still running; "Ready" means at least one contact has cleared every required stage and can receive email. You do not have to wait for the full build to complete before you launch - you can click Launch Campaign as soon as the Ready state appears and emails will start going out to ready contacts while the rest of the pipeline continues.
The pre-launch checklist enforces:
- At least one contact imported
- A non-empty campaign name
- A contact limit greater than zero
- A valid sending schedule (days selected, start and end times set, supported timezone)
- At least one email sequence step with copy
- Every AI variable referenced in the copy maps to a prompt that will produce output at send time
Timezone validation is strict. If you enter a timezone that the sending provider does not support, Ken will reject it at save time with a clear error message rather than letting it fail silently at launch.
If a launch attempt fails after the setup steps succeed, the campaign resolves back to Ready instead of showing a dead-end Error state. The Launch Campaign button reappears so you can retry without contacting support.
Troubleshooting & debugging
Symptom: "Create with AI" button is greyed out
- Likely cause: AI campaign credits are exhausted.
- What to check: look for the credit counter in the header bar. If it shows 0, upgrade your plan or wait for the next billing cycle (see Billing).
- You can still click Create Manually to create the campaign without using an AI credit.
Symptom: Campaign stays in Draft after clicking Start
- Likely cause: one or more readiness checks are failing and the start action is blocked.
- What to check: look at the checklist shown below the campaign header on the Actions tab when the campaign is in Draft state. Each failing check has a specific message. Common blockers are no contacts imported, no email sequence steps, or no sending schedule set.
Symptom: Launch Campaign button never appears after building completes
- Likely cause: no contacts passed email verification, or all contacts were filtered out by qualification.
- What to check: open the Leads tab and check the contact count and status breakdown. If the verified email count is zero, enrichment may still be running (allow 20-40 minutes for a fresh import). If contacts show as disqualified, review your qualification prompt in Actions - Qualification.
Symptom: Settings save fails with a timezone error
- Likely cause: you selected a timezone not accepted by the sending provider. Raw UTC/GMT entries are rejected at save time.
- Fix: in the Sending Schedule section of Settings, use the timezone dropdown and select a named city zone (e.g. "America/New_York" instead of "UTC"). If you need UTC semantics, select "Atlantic/Reykjavik" - Iceland runs on UTC year-round with no daylight-saving shift.
Symptom: Campaign shows Error status after a launch attempt
- Likely cause: if the sending setup step succeeded but the final launch step failed, the campaign may resolve back to Ready rather than staying on Error. This is the correct behaviour.
- What to check: refresh the page. If the status badge shows Ready and the Launch Campaign button is visible, simply click it again to retry.
Symptom: Import progress dialog closes but the Leads tab shows zero contacts
- Likely cause: the import completed but deduplication removed all rows (contacts already exist in this or other campaigns, depending on your dedup settings).
- What to check: open Settings and review the Deduplication section. If "Don't allow duplicates from other campaigns" is checked, any contacts already in the system will be filtered out.
Symptom: Campaign analytics show zero stats
- Likely cause: this can happen for newly launched campaigns - allow up to one hour for the first stats to appear. It can also indicate the campaign never actually transitioned to Sending.
- What to check: verify the status badge in the campaign header shows Sending. If it shows Scheduled or Launching, the campaign is still in a transition state and will start sending automatically.
FAQ
Can I change the contact limit after the campaign is created? No. The contact limit is locked once processing starts. Set it before you click Start on a Draft campaign. You can still edit it in Settings while the campaign is in Draft state and no import has run.
What is the difference between "Create with AI" and "Create Manually"? Both create the same type of campaign. "Create with AI" routes you to an AI-guided build flow that generates your sequence copy and targeting recommendations. "Create Manually" takes you straight to the Actions tab where you configure everything yourself. AI creation costs one AI campaign credit; manual creation does not.
Can I launch before all contacts are processed? Yes. As soon as the campaign status shows Ready (even alongside Building), the Launch Campaign button appears. Emails go to contacts who are already ready; the rest follow as they clear the pipeline.
My CSV upload failed. What columns are required? Required: First Name, Last Name, and either Company Name or Company Domain. The column-mapping step lets you match your headers to these fields, so the exact column name in your file does not matter as long as you map it correctly.
Why does my campaign show both Building and Ready at the same time? That is intentional. Building means the enrichment and qualification pipeline is still running for some contacts. Ready means at least one contact has cleared every step and can receive email. You can launch in this state.
How long does the build pipeline take? Typically 20-40 minutes for a fresh import of up to a few thousand contacts. Larger imports or those requiring heavy enrichment may take longer. The campaign status badge updates automatically as contacts clear each stage.