
The email sequence editor
Build and manage a multi-step cold-email sequence inside a campaign, controlling copy, wait timing, A/B variants, personalization variables, and click tracking.
Overview
The sequence editor is where you write the actual emails that go out to prospects. Each campaign can hold multiple segments, each segment has its own sequence of email steps, and each step can carry up to four A/B variants (A, B, C, D). You control the wait between steps, the subject line, the body copy, and whether opens are tracked.
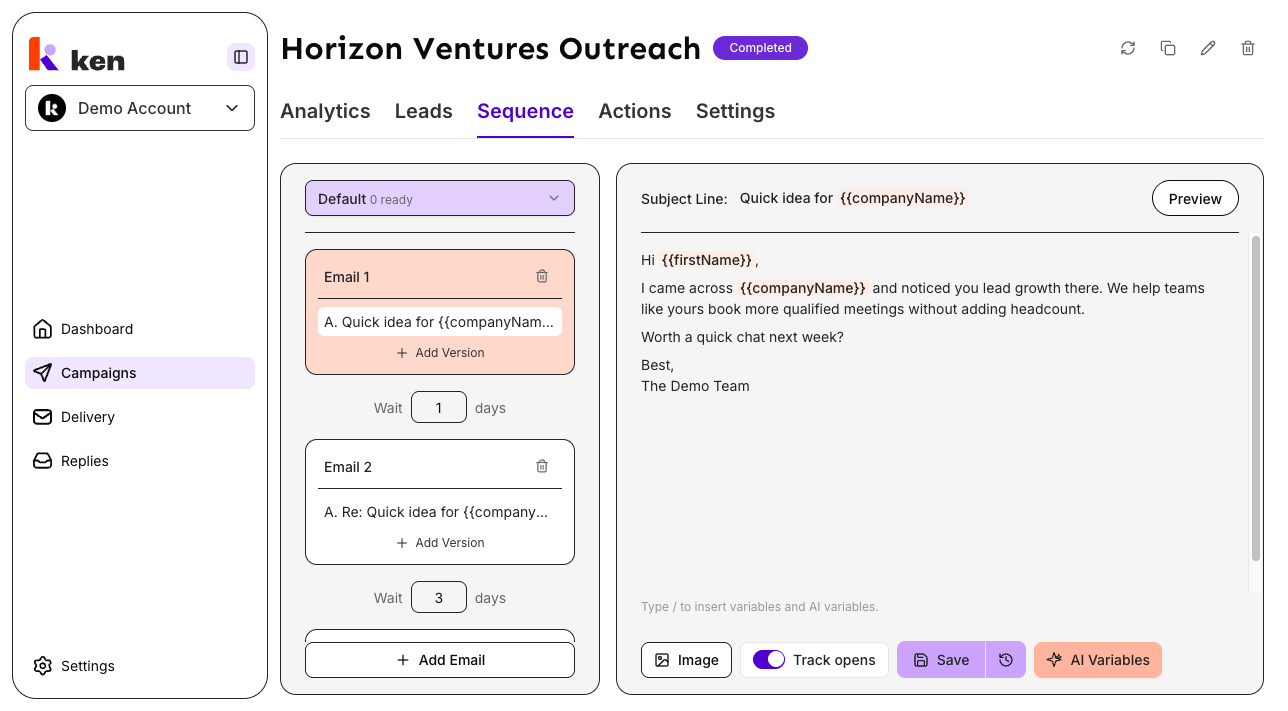
To reach it: open any campaign, then click the Sequence tab. The page splits into two panels - a left panel listing your email steps and a right panel showing the editor for the selected step.
Before you start
- You must have an existing campaign. Create one first from the Campaigns list.
- You need at least one segment on the campaign. The segment dropdown at the top of the left panel populates from your campaign's segments and shows how many contacts are ready in each one.
- To use AI-personalized variables (
{{variableName}}), the campaign must have a saved audience segment so the AI Variables dialog can evaluate them against real leads.
How to build your sequence
Step 1 - Select a segment
Open the segment dropdown at the top of the left panel. It shows each segment name and its ready contact count. Pick the segment you want to write copy for. Each segment holds an independent sequence.
Step 2 - Add an email step
If the sequence is empty, click Add Email in the center of the left panel. If you already have steps, click Add Email at the bottom of the step list. Each new step appears as a card labeled "Email 1", "Email 2", and so on.
The editor enforces a maximum of 30 email steps per segment.
Step 3 - Write the subject line and body
Click an email card in the left panel to select it. The right panel loads the editor for that step.
- The Subject Line field is at the top of the editor. For email 1, write a subject. For follow-up steps, leave it empty to keep the reply thread (the placeholder reads "Leave empty for threaded emails").
- The body area sits below the divider. Write your email copy there. The placeholder reads "Write your email here...".
- Use the floating formatting toolbar (appears when you select text) for Bold, Italic, Underline, Strikethrough, link, bullet list, and numbered list.
- Click Image in the bottom toolbar to embed an image (PNG, JPEG, or WebP, up to 10 MB).
Step 4 - Insert variables
Type / anywhere in the body (or subject line) to open the variable menu. The menu groups options into three categories:
- Variables - standard contact and company merge fields like
{firstName},{company},{title},{industry}. These use single braces. - Sender - sender system fields:
{sender_first_name},{sender_last_name},{sender_signature}. These also use single braces. - AI Variables - custom AI-personalized fields. These use double braces:
{{variableName}}.
Alternatively, type { to trigger an autocomplete menu for lead and sender variables, or {{ to trigger the AI/custom variable menu.
Variables are highlighted in the editor:
- Standard and sender variables appear with a light blue chip.
- AI variables appear with an orange chip.
- Tracking link placeholders appear with a green chip.
- Unrecognized tokens appear red with a strikethrough - fix or remove them before saving.
Step 5 - Configure AI Variables
If your copy uses {{doublebraceVariables}}, click AI Variables (the button with the sparkle icon in the bottom-right of the editor). This dialog lets you give each AI variable a description so the platform knows what to generate. AI variables without a saved description will block campaign launch.
Step 6 - Add tracking links
Select text in the body you want to make into a link, then click the link icon in the floating formatting toolbar. The "Insert link" dialog appears. Paste the destination URL and click Apply.
When a campaign ID is present, every link you insert becomes a unique tracked redirect - one per occurrence. You will see a note: "This link will be created as a unique tracking link for this email version." The link appears as a green chip in the editor body.
You do not need to manage tracking links manually on save - any plain anchor links in the body are automatically converted to tracked redirects when you save.
Step 7 - Set the wait between steps
Below each email card in the left panel (except the last one) is a "Wait X days" control. Enter a number between 1 and 30. This is the delay after that step before the next step fires. If you leave the field empty it defaults to 3 days. The final email in a sequence does not show a wait input.
Step 8 - Enable or disable open tracking
In the bottom toolbar of the editor, toggle Track opens on or off. Open tracking is enabled by default. If you have an embedded image in the email, open tracking is required and the toggle is locked on.
Step 9 - Add A/B variants
Each email step supports up to four variants (A, B, C, D). Inside a selected email card in the left panel, click the + icon to add a variant. Click a variant row to edit it in the right panel. You can toggle variants active or inactive with the switch next to each variant row. At least one variant must stay active - the editor blocks you from disabling the last active one.
To rename a variant, double-click its row label in the left panel.
Step 10 - Save
Click Save in the bottom-right of the editor. A toast confirms success. The sequence auto-saves via a debounced save as you type, but the Save button triggers an immediate save and lock.
How it works
The sequence editor enforces the constraints of the downstream sending engine so errors surface in the UI rather than at campaign launch.
Wait days. Every step - including the first and last - must have a wait value of at least 1 day and no more than 30. The editor enforces this range at every point: when loading from the API, when you type and leave the field, and when saving. Entering a non-numeric value snaps back to the previous valid number; leaving the field empty resets to 3. The last step's wait value is stored but never shown, because there is no next step to gate.
Variables. The brace syntax is a strict contract with the backend. Single-brace tokens ({name}) resolve to lead and sender fields. Double-brace tokens ({{name}}) are AI-personalized and require a saved description. Sender variables ({sender_first_name}, {sender_signature}) are treated as single-brace fields, matching how the backend resolves them against the sending inbox. The editor flags unrecognized single-brace tokens in red so typos are visible before saving.
Tracking links. When you save a sequence, every plain anchor link in the body is automatically converted to a unique tracked redirect - one per occurrence in the email. The same destination URL appearing in two different steps gets two separate tracked links. This keeps click attribution unambiguous: a click maps back to the exact step, variant, and segment it came from. At send time, each recipient gets their own unique short link, so a click traces to one specific person.
Preview. Click Preview (top-right of the editor) to open the email preview dialog. It renders the email inside realistic Gmail, Outlook, and Apple Mail shells on desktop and mobile. For follow-up steps, it builds a quoted thread with accurate "sent N days ago" timestamps derived from your configured wait days. If you load a real lead for the preview, missing variables render as empty strings - not placeholder text - so you see exactly what the recipient sees.
Ready counts. The segment dropdown shows "X ready" beside each segment name. If the count appears as 0 despite the campaign having contacts, the editor will attempt to refetch the authoritative count from the segments endpoint. If the refetch fails, it falls back to the campaign-level contact count rather than blocking the editor.
Troubleshooting & debugging
"Failed to load sequence data" in the left panel The sequence fetch failed. Check your network connection and reload the page. If the error persists, check whether the campaign's status allows editing (a launched campaign has a read-only indicator at the top of the editor).
"0 ready" shown on all segments despite contacts existing The campaign detail response returned a placeholder or zero ready count. The editor should auto-refetch from the segments endpoint. If it does not, reload the page or switch away from the Sequence tab and back.
Subject line shows "Leave empty for threaded emails" but I need a subject That placeholder appears on step 2 and later. Those steps send as replies in the same thread by default. If you want a fresh subject on a follow-up, type over the placeholder - the field is editable.
Red strikethrough variable chip in the editor
The variable token is unrecognized. Check spelling: single-brace for lead/sender fields ({firstName}, {sender_signature}), double-brace for AI fields ({{customVar}}). An incorrect brace count or a misspelled field name causes the red highlight.
"AI Variables" dialog shows an error or empty state Standard variables failed to load from the API. The bottom of the editor shows "Failed to load sequence variables." when this happens. Reload the page. If the error persists, the variables API may be unavailable - contact support.
Campaign will not launch due to missing AI variable descriptions
Every {{doublebraceVariable}} used in the body must have a saved description in the AI Variables dialog. Open the dialog, find the highlighted variable with no description, fill it in, and save. The launch check runs this validation before allowing the campaign to go live.
Tracking link appears as a plain URL after save If a link creation fails during save (for example, due to a network error), the occurrence stays as a plain anchor rather than blocking the whole save. Re-save or re-insert the link manually.
Wait days snap to 1 even though I typed a different number The valid range is 1 to 30. Values below 1 are clamped up to 1; values above 30 are clamped down to 30. Decimals and non-numeric characters are discarded.
Editor is read-only If the campaign is launched, the sequence editor enters a read-only state. To edit copy, you must pause or stop the campaign first.
FAQ
Can each segment have a different sequence? Yes. Every segment has an independent sequence. Switch segments using the dropdown at the top of the left panel. Changes to one segment do not affect others.
What happens if I leave the subject line blank on email step 1? The backend requires a subject on the first step. The editor does not enforce this in the UI on its own, but a blank subject on step 1 will result in a validation error at launch. Always add a subject to the first email.
How many A/B variants can I add per step? Up to four: A, B, C, and D. The "+" button disappears once four variants exist.
Can I reorder email steps? Reordering is not supported in the current editor. Steps appear in the order they were added. To change order, delete and re-add steps.
Do tracking links work if my campaign is paused? Existing tracking links continue to resolve while a campaign is paused. New links minted before the pause remain active.
What image formats are supported in the body? PNG, JPEG, and WebP, up to 10 MB per file. Embedding an image automatically locks open tracking on for that variant.